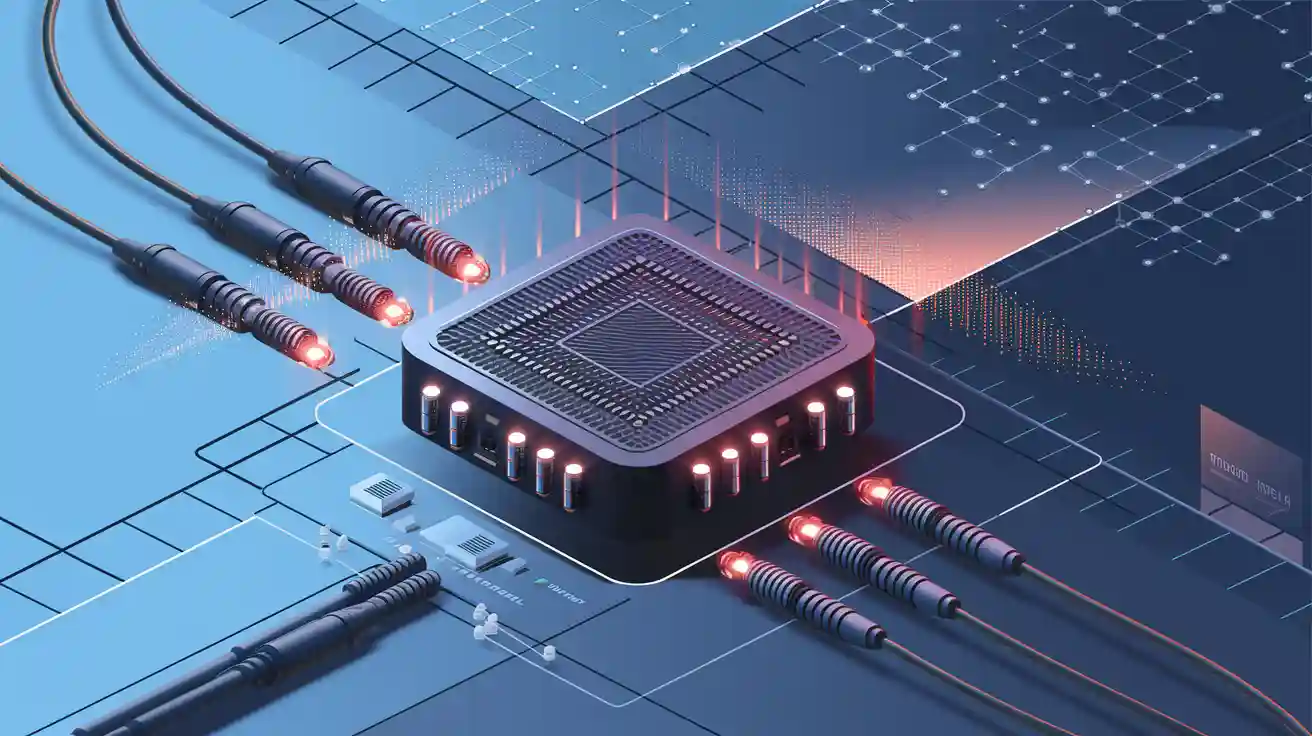
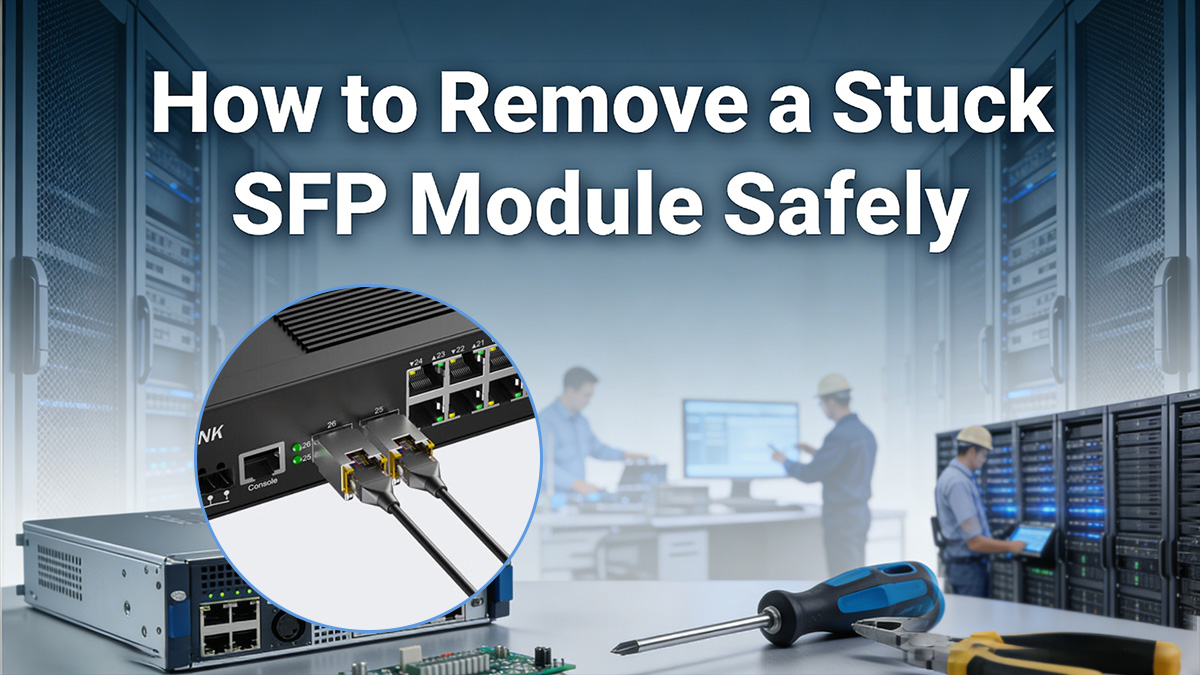
Removing an SFP module from a network switch may appear simple, but improper handling can damage the transceiver, the switch port, or even the fiber interface. Whether you are performing routine maintenance, replacing a failed optical transceiver, upgrading link speeds, or troubleshooting a connection issue, understanding the correct removal procedure is essential.
SFP (Small Form-factor Pluggable) modules are hot-pluggable optical or copper transceivers designed under the Multi-Source Agreement (MSA) standard. They are widely used in enterprise switches, data center aggregation layers, industrial Ethernet systems, and telecom access equipment. While the hot-swappable design allows removal without powering down the device in most cases, incorrect technique—such as pulling without releasing the latch or disconnecting fiber improperly—can lead to:
Bent or damaged switch cage connectors
Broken latch mechanisms
Fiber contamination or connector damage
Electrostatic discharge (ESD) related failures
In practice, many engineers search “how to remove SFP module from switch” only when a module feels stuck or when they are uncertain whether powering off is required. This guide provides a clear, step-by-step removal procedure, explains different SFP latch types, and outlines professional safety precautions to prevent port damage.
By the end of this article, you will understand:
Whether you need to power off before removing an SFP
How to identify and unlock different latch mechanisms correctly
What to do if an SFP module is stuck
How to remove SFP and SFP+ modules safely without damaging the switch
This technical guide is written for network engineers, IT administrators, and field technicians who require precise, risk-aware instructions aligned with current enterprise networking best practices.
🔷 Do You Need to Power Off Before Removing an SFP?
For most modern network equipment, you do not need to power off the switch before removing an SFP module. However, there are important technical and operational considerations that must be understood to avoid unintended service disruption or hardware damage.
This section addresses the most common safety concern behind the query “how to remove SFP module from switch” — whether the device must be powered down first.
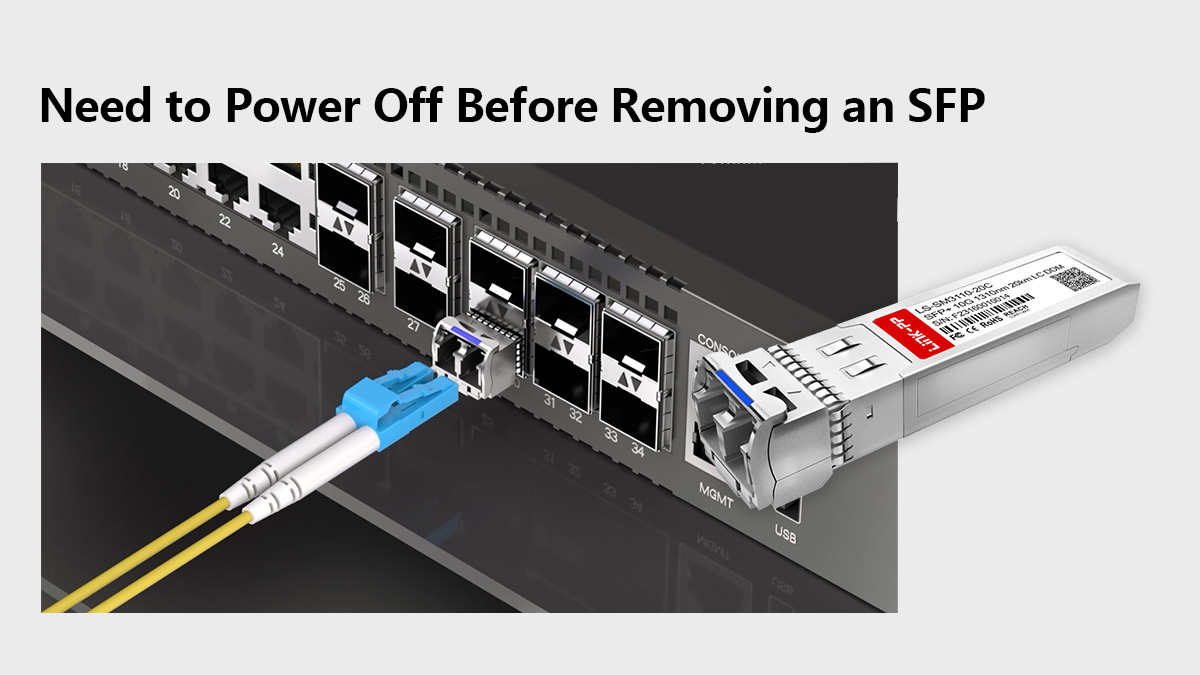
Is SFP Hot-Swappable?
Yes. Standard SFP and SFP+ modules are designed to be hot-pluggable (hot-swappable) under the SFP Multi-Source Agreement (MSA).
Hot-swappable means:
The module can be inserted or removed while the switch is powered on.
No electrical damage occurs to the port during insertion or removal.
The switch detects the module dynamically via its I²C interface.
Most enterprise switches from major vendors support hot swapping without requiring a reboot. When the module is removed:
The link immediately drops.
The port transitions to a “link down” state.
No permanent configuration changes occur.
However, hot-swappable does not mean “risk-free.” Proper handling is still required to prevent mechanical or optical damage.
What Happens If You Remove an SFP While Powered On?
In normal operating conditions:
The link goes down instantly.
Any traffic passing through that port is interrupted.
The switch logs an interface-down event.
No physical damage occurs to the port or module (if removed correctly).
Potential operational impacts include:
Temporary network outage for connected devices.
Spanning Tree or routing protocol reconvergence.
Alarm triggers in monitoring systems.
In data centers or core networks, removing an SFP from an active uplink can trigger failover events. Therefore, even though powering off is not required, it is best practice to:
Disable the interface in software (if possible).
Confirm redundancy is in place.
Inform affected teams before removal.
Enterprise vs. Industrial Switch Considerations for SFP Removal
While most enterprise switches fully support hot-swappable SFP modules, industrial environments require additional caution.
Feature / Aspect | Enterprise Ethernet Switches | Industrial Ethernet Switches |
|---|---|---|
Environment | Controlled indoor environments | −40°C to +75°C/85°C, high vibration, electrically noisy |
Hot-Swap Support | Fully supports live insertion/removal | Supports hot-swap, but requires additional caution |
Firmware Behavior | Logs module changes automatically without reboot | May require careful operational monitoring |
Cooling / Temperature | Stable cooling systems maintain optimal operating temperature | Modules can get very hot; allow temperature stabilization before handling |
Latch Mechanism | Standard latches, easy release | Vibration-locked cages may require firmer latch release |
ESD / Handling | Standard ESD precautions sufficient | Extra ESD protection needed, especially in dry or outdoor environments |
Operational Advice | SFP removal during operation is standard practice | Powering down is safer during scheduled maintenance windows |
Removing SFP Module Tips:
You generally do not need to power off before removing an SFP module. However:
Always disconnect the fiber cable first.
Consider administratively shutting down the interface.
Ensure traffic redundancy if removing an active uplink.
Use proper ESD precautions.
Allow overheated modules to cool before handling.
Understanding the hot-swappable nature of SFP modules reduces unnecessary downtime while maintaining hardware safety.
Next, we will examine the different SFP latch mechanisms and how to unlock them correctly before removal.
🔷Types of SFP Latch Mechanisms Explained
One of the main reasons users search “how to remove SFP module from switch” is physical uncertainty — the module will not slide out, and forcing it risks damaging the port.
SFP modules use mechanical latch systems to secure the transceiver inside the switch cage. These latches prevent accidental disconnection due to vibration, cable tension, or airflow movement.
Before attempting removal, you must identify the latch type. Pulling without unlocking the mechanism can bend the metal cage, break the latch, or damage internal connectors.
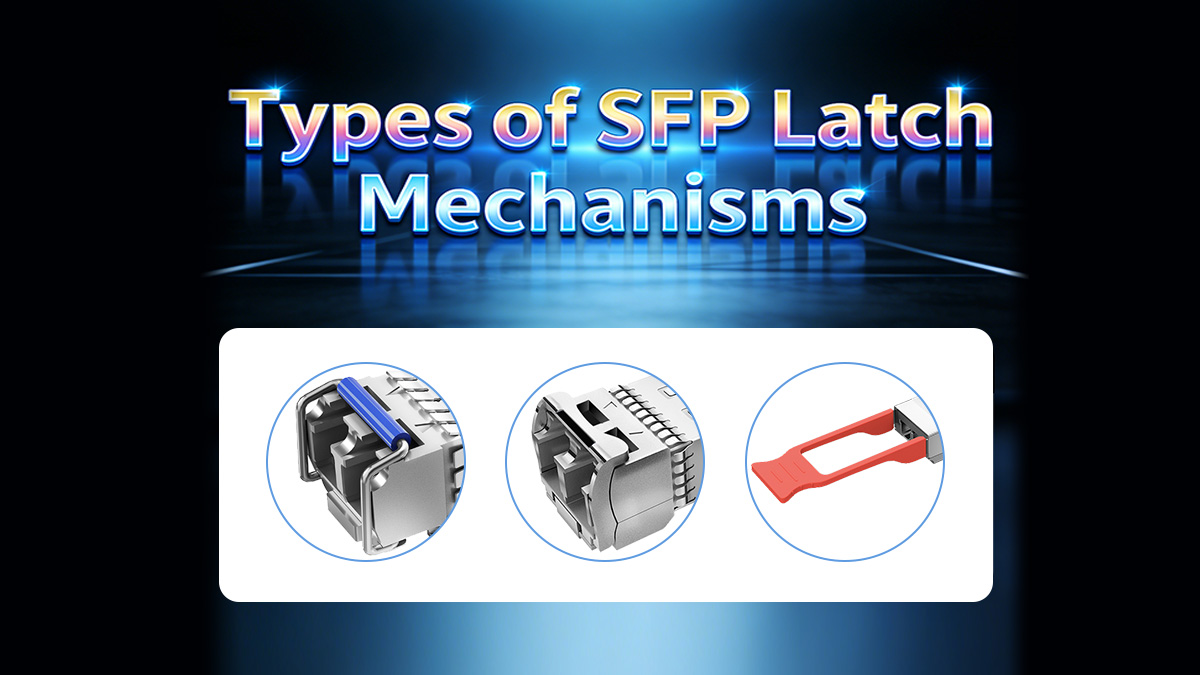
Below are the four most common SFP latch mechanisms.
1. Bail Latch (Wire Handle)
Most common in enterprise SFP and SFP+ modules.
The bail latch uses a small hinged metal wire loop located on the front of the module. When folded upward or outward, it disengages the internal locking tab.
How it works:
In the closed position, the latch secures the module inside the cage.
Pulling the wire downward (or outward, depending on design) releases the locking clip.
Once unlocked, the module can be pulled straight out.
Important handling notes:
Always disconnect the LC fiber connector first.
Rotate the bail latch fully to the unlocked position before pulling.
Pull straight outward — never twist.
Do not use tools to pry the latch.
Improper force can break the hinge or deform the cage.
2. Plastic Pull Tab
Common on some copper SFP modules and cost-optimized optical transceivers.
Instead of a metal bail, these modules include a small plastic tab or lever.
How it works:
Pulling the tab outward disengages the locking mechanism.
The module is then removed by continuing to pull gently.
Risks:
Plastic tabs can snap if pulled at an angle.
Dust or debris may prevent smooth release.
If resistance is felt:
Stop pulling.
Check that the tab is fully extended.
Verify the fiber cable is removed.
3. Push-Pull Latch
Less common but used in certain industrial or telecom modules.
This mechanism releases when the front section is either:
Pushed inward slightly, then pulled out, or
Pulled straight outward with a specific motion.
How to identify:
No visible bail wire.
No obvious plastic tab.
Slight resistance at initial pull.
If unsure:
Check the module manufacturer’s documentation.
Do not apply excessive force.
Push-pull designs rely on internal spring clips, which can be damaged if twisted.
4. No-Latch (Older Models)
Some early-generation SFP modules have no visible latch. They rely purely on friction and internal spring contacts.
Removal method:
Disconnect fiber.
Pull straight out using steady, even force.
These modules require more grip control but should still slide out without excessive resistance.
If the module feels stuck:
Confirm there is no hidden latch.
Inspect for bent cage rails.
Avoid tools unless absolutely necessary.
Why Identifying the SFP Latch Type Matters
Using the wrong removal method is the most common cause of:
Broken SFP handles
Bent switch cages
Port misalignment
Permanent hardware damage
Professional best practice is simple:
Identify the latch type first. Unlock fully. Pull straight. Never twist.
Understanding the mechanical design eliminates guesswork and prevents costly mistakes during maintenance.
Next, we will move to the step-by-step removal procedure, combining hot-swap awareness, latch handling, and ESD-safe practices into a clear operational workflow.
🔷 Step-by-Step Guide — How to Remove SFP Module from Switch
This section provides a clear, field-ready procedure for safely removing an SFP module from a network switch. The steps apply to standard SFP, SFP+, and most SFP28 transceivers designed under the MSA specification.
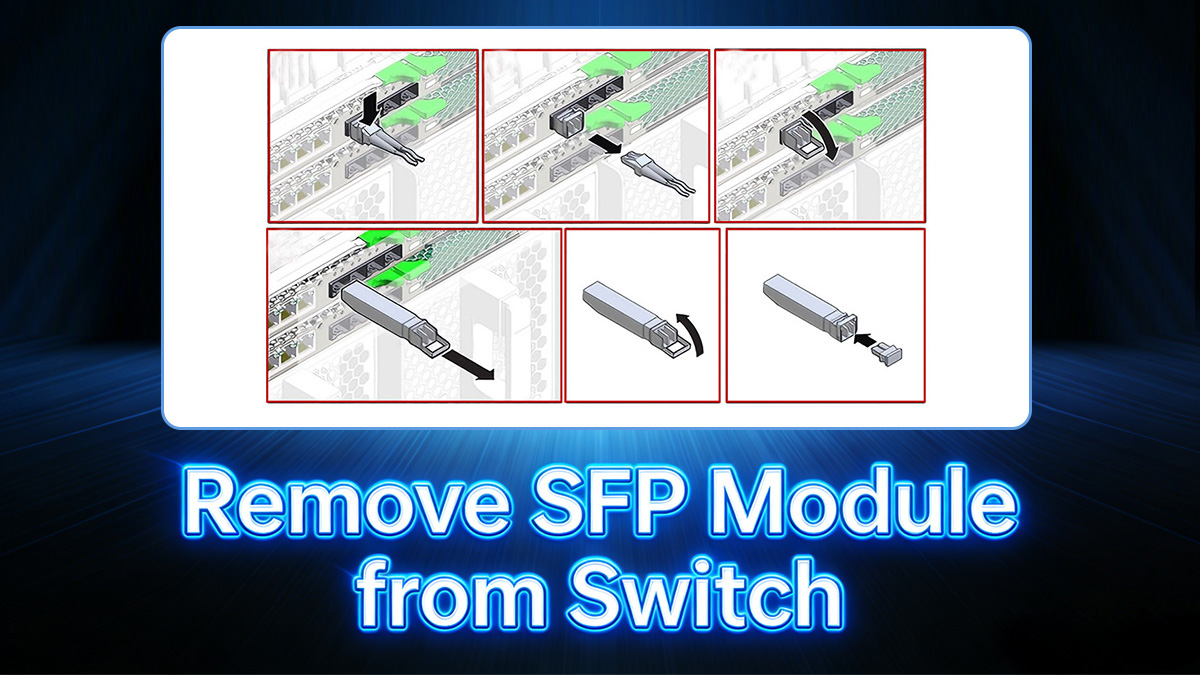
Follow the sequence carefully to avoid damaging the switch port, the optical transceiver, or the fiber interface.
Step 1: Disconnect the Fiber Cable (LC Connector)
Before touching the SFP module itself:
Locate the LC duplex connector plugged into the front of the transceiver.
Gently press the latch on the LC connector.
Pull the fiber connector straight out.
Why this matters:
Prevents tension from pulling against the SFP during removal.
Avoids bending the fiber ferrule.
Reduces the risk of damaging the optical interface.
After removal:
Immediately install dust caps on both the fiber connector and the SFP optical ports (if available).
Avoid touching the ferrule end-face.
Never attempt to remove an SFP while the fiber cable is still attached.
Step 2: Verify Link Down Status
Once the fiber is disconnected:
Check the switch port LED (it should turn off or indicate link down).
Optionally confirm via CLI or management interface that the port status is down.
Example best practice in enterprise environments:
Administratively disable the interface before removal.
Confirm no critical traffic is passing through the link.
This step ensures you are not unintentionally interrupting production traffic.
Step 3: Unlock the Latch Correctly
Identify the latch mechanism:
Bail latch (metal wire)
Plastic pull tab
Push-pull latch
No-latch type
For bail latch:
Rotate the wire downward or outward until it clicks into the release position.
For plastic tab:
Pull the tab straight outward.
For push-pull:
Follow manufacturer guidance; usually pull outward firmly but evenly.
Important:
Do not twist the module.
Do not use excessive force.
Ensure the latch is fully disengaged before pulling.
If resistance remains, stop and recheck the latch position.
Step 4: Pull Straight Out
Once unlocked:
Grip the body of the SFP module.
Pull straight outward along the axis of the port.
Apply steady, even pressure.
Do not:
Rock the module side to side.
Twist the module.
Use pliers unless absolutely necessary (and only as a last resort).
Properly released modules should slide out smoothly without excessive force.
Step 5: Install Dust Cover
Immediately after removal:
Install a protective dust plug into the SFP port.
If storing the module, place a dust cap over the optical interface.
Store the module in an anti-static bag.
Why this matters:
Prevents dust contamination inside the switch cage.
Protects optical interfaces from debris.
Reduces long-term signal degradation risk.
Quick Checklist for Safe SFP Removal
Step | Action | Why It Matters | Risk If Skipped |
|---|---|---|---|
1 | ✔ Disconnect fiber cable first | Removes cable tension and protects LC connector | Fiber damage, ferrule contamination |
2 | ✔ Confirm link down status | Prevents unexpected traffic interruption | Network outage or reconvergence event |
3 | ✔ Fully unlock latch mechanism | Ensures internal clip is disengaged | Broken latch or bent switch cage |
4 | ✔ Pull straight outward | Maintains connector alignment | Port misalignment or mechanical damage |
5 | ✔ Install dust protection | Prevents dust and contamination | Long-term optical signal degradation |
Following this structured procedure ensures safe removal while preserving both the SFP module and the switch hardware.
Next, we will address what to do if the module does not come out normally in the section: How to Remove a Stuck SFP Module Safely.
🔷 How to Remove a Stuck SFP Module Safely
If you searched “how to remove SFP module from switch” because the module will not come out, stop and assess before applying force.
A stuck SFP is usually caused by a mechanical latch issue, debris, heat expansion, or improper previous installation—not by an electrical problem. Forcing removal can permanently damage the switch cage, which is far more expensive to repair than replacing the transceiver.
This section explains how to troubleshoot safely.
Why SFP Modules Get Stuck
Several mechanical and environmental factors can prevent smooth removal:
1. Latch Not Fully Released
The most common cause.
Bail latch not rotated fully
Plastic tab not pulled completely outward
Internal clip still engaged
Even partial engagement can prevent removal.
2. Fiber Still Attached
If the LC connector is still connected:
Cable tension pulls against the module
Removal force increases dramatically
Optical port can crack or bend
Always disconnect fiber first.
3. Thermal Expansion
SFP modules generate heat during operation. In high-load or poorly ventilated environments:
The metal housing expands slightly
Friction inside the cage increases
Removal becomes tighter
Allow the module to cool for several minutes before retrying.
4. Bent or Deformed Cage
If the module was previously inserted at an angle:
Internal cage rails may be misaligned
Retention springs may bind
This is less common but more serious.
What NOT to Do
When an SFP feels stuck, avoid the following mistakes:
❌ Do not twist the module side-to-side
❌ Do not use excessive force
❌ Do not pry with a screwdriver
❌ Do not pull by the fiber cable
❌ Do not rock the module vertically
These actions can cause:
Bent connector pins
Damaged EMI cage
Broken latch
Permanent port failure
Switch cages are thin precision metal structures—not designed for torque.
When to Use Pliers (And When Not To)
Using pliers should be considered last resort only, and only under controlled conditions.
Acceptable Use Case:
Bail latch is broken but partially accessible
Module body is intact
Switch is powered down
You have firm, straight pulling access
Use small needle-nose pliers to grip the metal housing—not the latch. Pull straight outward with steady force.
When NOT to Use Pliers:
Switch is powered on
Cage appears bent
Module housing is cracked
You must twist to gain leverage
You are pulling at an angle
Improper tool use often causes more damage than the original problem.
SFP Port Damage Risks
Improper forced removal can result in:
Bent internal cage rails
Deformed retention springs
Misaligned electrical contacts
EMI shielding damage
Inability to seat future SFP modules properly
In enterprise switches, cage damage typically requires:
Full switch replacement
Professional board-level repair
Warranty voiding
The financial impact is significantly higher than replacing a transceiver.
Safe Emergency SFP Module Removal Procedure
If an SFP is stuck:
Disconnect fiber completely.
Ensure latch is fully disengaged.
Allow module to cool.
Apply steady, straight outward pressure.
Power down only if mechanical resistance persists.
If resistance remains after these steps, stop and consult the switch manufacturer before proceeding.
Understanding why SFP modules get stuck—and resisting the instinct to force removal—prevents costly hardware damage and ensures long-term port integrity.
Next, we will cover Safety Precautions and ESD Protection, which are often overlooked during urgent troubleshooting.
🔷 Safety Precautions and ESD Protection
Even though SFP modules are hot-swappable, they are still precision electro-optical devices. Improper handling can cause latent damage that may not appear immediately but can reduce long-term reliability.
Professional network maintenance procedures always include ESD control, contamination prevention, and mechanical protection.
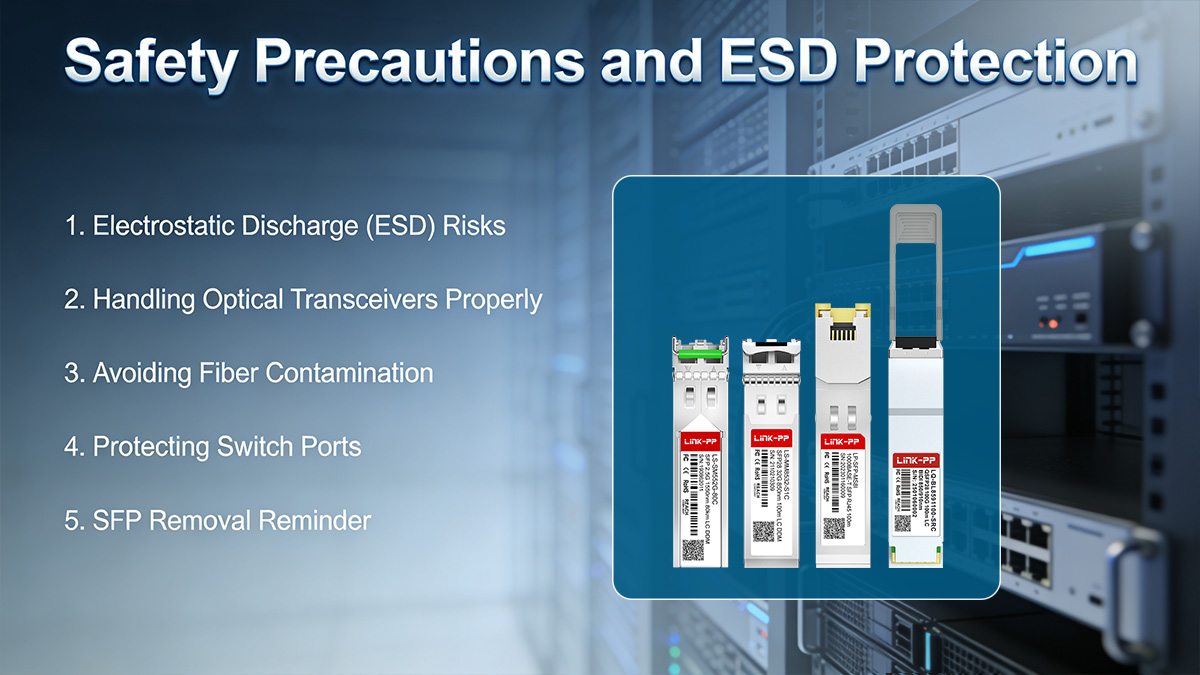
Electrostatic Discharge (ESD) Risks
SFP modules contain:
High-speed driver ICs
EEPROM components
These electronic components are sensitive to electrostatic discharge (ESD).
A static discharge as low as 100–200 volts (well below the threshold humans can feel) can damage semiconductor structures.
High-risk environments include:
Dry indoor climates
Carpeted server rooms
Outdoor industrial cabinets
Low-humidity winter conditions
Best Practice:
Wear an ESD wrist strap connected to ground.
Avoid touching electrical contact pads.
Handle the module by its metal housing.
Store removed modules in anti-static bags.
Latent ESD damage may not cause immediate failure but can shorten module lifespan.
Handling Optical Transceivers Properly
An SFP module is not just an electrical interface—it is also a calibrated optical device.
Proper handling includes:
Holding the module by the sides of the housing.
Avoiding pressure on the latch mechanism.
Never touching the gold edge connector.
Avoiding dropping the module onto hard surfaces.
Mechanical shock can misalign internal optics or crack solder joints.
If a module has been dropped, inspect it before reuse.
Avoiding Fiber Contamination
Optical signal quality depends on clean fiber end faces. Even microscopic dust particles can cause:
Increased insertion loss
Reflection (return loss issues)
Link instability
Before and after removal:
Immediately install dust caps on both SFP optical ports.
Cap the LC fiber connectors.
Avoid placing fiber connectors on dusty surfaces.
Use fiber cleaning tools if contamination is suspected.
A contaminated connector can degrade link performance without obvious visible damage.
Protecting Switch Ports
The SFP cage inside a switch is a precision metal structure designed to maintain alignment between:
Electrical contacts
Optical interface
Retention springs
To protect the switch port:
Always unlock the latch before pulling.
Pull straight outward without twisting.
Avoid inserting objects into the cage.
Do not leave the cage exposed in dusty environments.
If no module will be installed immediately, consider using a port dust plug to prevent debris accumulation.
Damage to the cage can prevent proper seating of future SFP modules and may require board-level repair.
SFP Removal Reminder
Safe SFP removal is not only about getting the module out—it is about preserving:
Signal integrity
Port alignment
Optical cleanliness
Long-term equipment reliability
Following proper ESD and contamination control procedures aligns with enterprise and data center maintenance best practices.
Next, we will review Common Mistakes When Removing SFP Modules, highlighting real-world errors that frequently cause avoidable hardware damage.
🔷 Common Mistakes When Removing SFP Modules
Most hardware damage during SFP removal does not happen because the module is defective—it happens because of improper handling.
If you searched “how to remove SFP module from switch” during maintenance, avoiding these common mistakes will protect both the transceiver and the switch port.
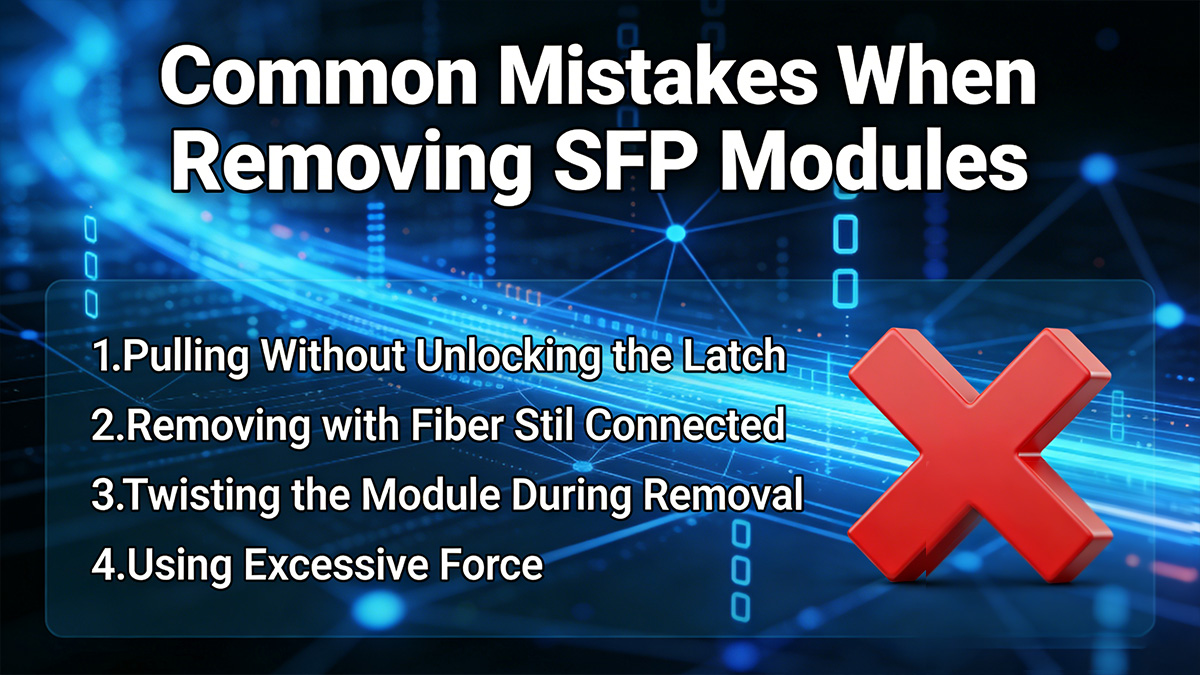
Pulling Without Unlocking the Latch
This is the most frequent and most damaging mistake.
Every modern SFP or SFP+ module includes a mechanical retention mechanism. If the latch is not fully disengaged:
The internal locking clip remains engaged.
Excessive force transfers to the switch cage.
The EMI cage can bend or deform.
Even partial latch engagement can prevent smooth removal.
Correct approach:
Identify the latch type first.
Fully rotate or extend the release mechanism.
Confirm it moves freely before pulling.
If resistance remains, recheck the latch instead of increasing force.
Removing with Fiber Still Connected
Attempting to remove an SFP optical module while the LC fiber connector is still attached creates tension against the module.
This can result in:
Damaged LC connector latch
Cracked ferrule
Bent optical alignment inside the module
Broken fiber strand
Additionally, pulling by the fiber cable instead of the module body can permanently damage the cable assembly.
Best practice:
Always disconnect the fiber first, then remove the module.
Twisting the Module During Removal
Some technicians instinctively twist the module side-to-side when it feels tight. This is unsafe.
Twisting can:
Bend internal guide rails
Misalign electrical contacts
Deform retention springs
Damage the PCB edge connector
SFP modules are designed for straight insertion and straight removal only.
If the module does not slide out smoothly:
Stop.
Recheck latch position.
Allow cooling if overheated.
Never apply rotational force.
Using Excessive Force
If you must “yank” the module out, something is wrong.
Excessive force can cause:
Permanent cage deformation
Switch port misalignment
Broken latch mechanisms
Warranty voiding
A properly unlocked SFP transceiver should require only moderate, steady pulling force.
If significant resistance persists:
Confirm fiber is disconnected.
Confirm latch is fully released.
Power down the switch if necessary.
Reattempt controlled removal.
If the module still does not move, consult manufacturer documentation before proceeding.
Correct SFP removal Rule of Thumb
If removal feels difficult, the solution is diagnosis, not force.
Correct SFP removal is:
Straight
Controlled
Latch-aware
Fiber-disconnected
ESD-conscious
Avoiding these common mistakes significantly reduces the risk of port damage and ensures long-term reliability of your network equipment.
Next, we will conclude with a concise operational summary and answer the most frequently asked questions about SFP removal procedures.
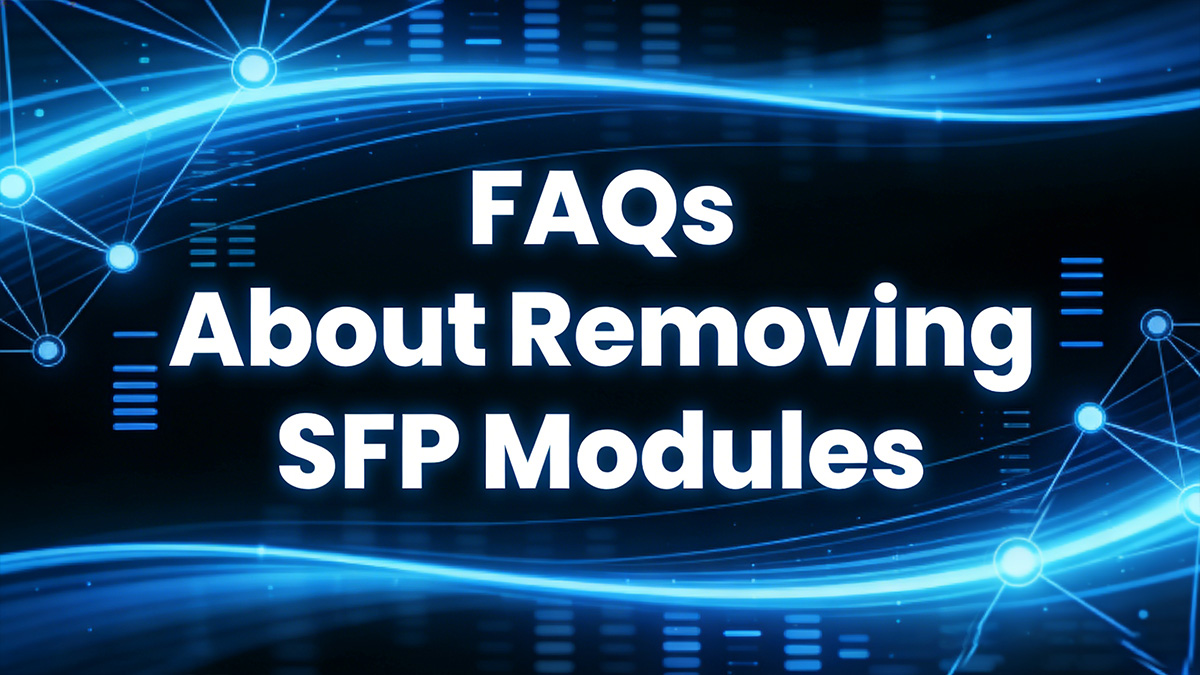
🔷 FAQs About Removing SFP Modules
Q1: Can SFP Modules Be Hot Swapped?
Yes. Most SFP, SFP+, and SFP28 modules are designed to be hot-swappable, meaning you can remove or insert them while the switch is powered on.
Notes:
Hot-swappable does not eliminate the need for proper procedure: disconnect fiber, unlock the latch, and pull straight.
Always confirm the switch supports hot swapping for your module type.
Enterprise switches generally support live removal; industrial or harsh-environment switches may require extra caution.
Q2: Why Won’t My SFP Come Out?
Modules may get stuck due to:
Latch not fully disengaged
Fiber cable still connected
Thermal expansion causing friction
Bent or misaligned switch cage
Solution:
Disconnect fiber first.
Fully unlock the latch.
Allow module to cool if recently active.
Apply steady, straight force; avoid twisting.
Consult vendor documentation if resistance persists.
Q3: Can Removing SFP Damage the Switch?
Yes, improper handling can cause permanent hardware damage, including:
Bent internal cage rails
Misaligned PCB connectors
Broken retention latches
EMI shielding damage
Prevention:
Unlock the latch completely
Pull straight outward
Avoid twisting or excessive force
Use ESD precautions
Correct procedure protects both the SFP module and the switch port.
Q4: Is SFP Removal the Same as SFP+?
Mechanically, yes:
Both SFP and SFP+ modules use similar MSA-standard cages and latch mechanisms.
Pull straight out after unlocking the latch, disconnecting fiber, and following ESD precautions.
Operational note:
SFP+ supports higher data rates (10G) and may generate more heat.
Allow hot SFP+ modules to cool before removal to reduce thermal friction.
Q5: How to Remove SFP from Cisco Switch?
Cisco switches follow the standard SFP removal procedure:
Ensure the link is down (administratively or automatically).
Disconnect the fiber cable (LC connector).
Lift the bail latch fully upward.
Pull the SFP module straight out along the port axis.
Insert dust caps immediately.
Cisco-specific tip:
Some older Cisco models may require a “no shutdown” CLI check after reinserting modules.
Always check the compatibility matrix and module firmware notes if using third-party SFP Modules.
🔷 When Should You Replace an SFP Module?
Even the most carefully handled SFP modules have a finite operational lifespan. Knowing when to replace a module prevents network downtime, improves link reliability, and provides a commercial opportunity for procuring high-quality replacements.

Signs of Failure
Common operational indicators that an optical transceiver may be failing include:
Intermittent link drops
Unexpected interface flaps
Reduced data throughput
CRC or error counters increasing on the interface
Modules exhibiting these behaviors consistently should be considered for replacement rather than troubleshooting alone.
DOM Alarm Triggers
Modules with Digital Optical Monitoring (DOM) provide real-time metrics such as:
Transmit power
Receive power
Module temperature
Supply voltage
Laser bias current
If DOM reports readings outside the vendor-specified thresholds (e.g., Tx/Rx power too low or laser overcurrent), it indicates the transceiver is degrading and may soon fail. Early replacement prevents unplanned downtime.
Overheating Modules
Excessive operating temperature is a frequent cause of SFP failure:
High port density or inadequate cooling in a switch can raise module temperature above safe limits.
Repeated overheating can degrade the laser diode or PCB components.
Check vendor specifications for maximum operating temperature (commonly 70°C for commercial modules and up to 85°C for industrial modules). Modules consistently running near these limits should be replaced proactively.
Aging Optical Transceivers
Even if there are no immediate errors, aging SFP modules:
May drift in optical power output
Experience gradual component degradation
Show reduced margin in longer links
For mission-critical or high-availability networks, replacing modules before end-of-life ensures sustained performance. Many enterprises track module age and plan replacements every 3–5 years depending on usage and environmental conditions.
Replacing SFP Modules Professional Recommendation
Replacing SFP modules proactively is part of best-practice network maintenance. Use this opportunity to:
Upgrade to higher-speed SFP+ or SFP28 if the link requires bandwidth
Switch to industrial-grade modules for harsh environments
Ensure modules include DOM/DDM for better monitoring and predictive maintenance
Browse high-quality SFP modules compatible with all major switch brands at LINK-PP Official Store for reliable replacements.